Follow our helpful resources
To use Map Viewer Plus and find what you need, we have provided helpful guides and videos for you to follow. You will find steps and directions here to help you use the features and functions. You can also refer to our FAQs if you require further information.
Please note that Map Viewer Plus is not supported by Internet Explorer, which is an incompatible browser.
If you have any questions, please contact our Customer Service Team.
Guides
The viewing pane is on the left-hand side of the map. These help you change your map view.
![]() Zoom in: click to zoom in.
Zoom in: click to zoom in.
![]() Zoom out: click to zoom out.
Zoom out: click to zoom out.
![]() Default extent: click to zoom out to map limit.
Default extent: click to zoom out to map limit.
![]() My Location: when using a mobile device, this button will pinpoint your location using broadcasting coordinates within the map or aerial imagery. Please note: Your ‘Location’ will need to be enabled on your device.
My Location: when using a mobile device, this button will pinpoint your location using broadcasting coordinates within the map or aerial imagery. Please note: Your ‘Location’ will need to be enabled on your device.
![]() View mode: click this to switch between Map View, Aerial Imagery View and Hybrid View.
View mode: click this to switch between Map View, Aerial Imagery View and Hybrid View.
Switching between map views
You can switch between three different map views by clicking the current mode button on in the viewing panel.
- Map view: the map view shows mapping layers such as street information, property numbers and boundaries. This will be the default view.
- Aerial view: the aerial view displays the most recent aerial imagery available for the area.
- Hybrid view: this view shows a combination of map layers and aerial imagery.
Note: using these buttons will reset the layer list to the default set for the specified map view.
![]() Back: go back to the previous view.
Back: go back to the previous view.
![]() Forward: following the use of the 'back' tool, you can use the 'forward' tool to revert to your latest generated view.
Forward: following the use of the 'back' tool, you can use the 'forward' tool to revert to your latest generated view.
At the top right is the widget pane. These navigate through the program and products available.
![]() Search: find a property or location in Western Australia (including Christmas and Cocos/Keeling Islands).
Search: find a property or location in Western Australia (including Christmas and Cocos/Keeling Islands).
![]() Layer List: turn map layers on and off to display different attributes.
Layer List: turn map layers on and off to display different attributes.
![]() Legend: find out what the colours and symbols on the map mean by referencing the legend.
Legend: find out what the colours and symbols on the map mean by referencing the legend.
![]() Available Products: find out what products are available to purchase for the location you have selected or are viewing on your map.
Available Products: find out what products are available to purchase for the location you have selected or are viewing on your map.
![]() Buy Aerial Photo (current and historical imagery): you can purchase and view aerial imagery and steps you through the buying process. Selecting this clears your last list selection.
Buy Aerial Photo (current and historical imagery): you can purchase and view aerial imagery and steps you through the buying process. Selecting this clears your last list selection.
![]() Property Sales View: view free property sales information based on location, sales dates and sales prices. Selecting this clears your layer list selection.
Property Sales View: view free property sales information based on location, sales dates and sales prices. Selecting this clears your layer list selection.
![]() The Print Function generates a PDF based on the information displayed on your screen. A hard copy print can be created from the PDF.
The Print Function generates a PDF based on the information displayed on your screen. A hard copy print can be created from the PDF.
![]() Select layer view: Select widget allows you to select an area and interrogate the survey information based on the selected layers. Note: Feature limits apply.
Select layer view: Select widget allows you to select an area and interrogate the survey information based on the selected layers. Note: Feature limits apply.
![]() Measurement Tool: Allows you to measure by area, distance between points and determine the co-ordinates of a specific point.
Measurement Tool: Allows you to measure by area, distance between points and determine the co-ordinates of a specific point.
![]() Info: lists helpful links to information associated with Map Viewer Plus.
Info: lists helpful links to information associated with Map Viewer Plus.
![]() Opens a new tab in your browser with the Landgate corporate website home page.
Opens a new tab in your browser with the Landgate corporate website home page.
![]() Opens a new tab in your browser with the privacy information for use of Landgate’s online applications.
Opens a new tab in your browser with the privacy information for use of Landgate’s online applications.
![]() Opens a new tab in your browser with the copyright information for all content on Landgate’s corporate website.
Opens a new tab in your browser with the copyright information for all content on Landgate’s corporate website.
![]() Opens a new tab in your browser with the disclaimer information for use of Landgate’s corporate website.
Opens a new tab in your browser with the disclaimer information for use of Landgate’s corporate website.
![]() Opens a new tab in your browser with the contact information for Landgate, including phone numbers, business hours and postal address.
Opens a new tab in your browser with the contact information for Landgate, including phone numbers, business hours and postal address.
![]() Opens a new tab in your browser with the Feedback Form to allow you to provide Landgate feedback on the Map Viewer Plus application.
Opens a new tab in your browser with the Feedback Form to allow you to provide Landgate feedback on the Map Viewer Plus application.
![]() Opens a new tab in your browser with this help page so that it can assist you with your Map Viewer Plus experience.
Opens a new tab in your browser with this help page so that it can assist you with your Map Viewer Plus experience.
![]() Opens a new tab in your browser with your shopping cart, so that you can view all the products currently added for purchase.
Opens a new tab in your browser with your shopping cart, so that you can view all the products currently added for purchase.
At the bottom left-hand side of the screen is the scale bar and a coordinate readout.
![]() This scale will change as you zoom in and out of the map to provide you a guide on distance that is being covered.
This scale will change as you zoom in and out of the map to provide you a guide on distance that is being covered.
![]()
These are rolling coordinates for points on the map. You can change the default display of geographical coordinates (latitude and longitude in decimal degrees) and projected (grid) co-ordinates by selecting the upwards arrow, then click on the coordinate capture icon to the left before clicking on the map to obtain the coordinate. MGA2020 is now an option.

If your map viewing session was closed, you can return to the last screen by clicking on this widget.
Click on the Locate a Property button ![]() .
.
There is a variety of search criteria you can enter to find the location you wish to view.
Searching by address
To locate a property with this search tool you will need to know the address of the property as officially recorded with Landgate.
As you type the address in the search box, the system will try to match the address to Landgate's address database. As the correct option is presented, click on this address to submit it.
If the system finds an exact match for your search address, it will display an image of the property in the map window. If the system cannot find an exact match for your search address, it will provide a list of addresses in the left-hand panel for you to choose from. Click on the most relevant search result for it to appear in the map window.
Searching by Certificate of Title
To locate a property with this search tool you will need to know the volume and folio number of the property you are looking for. Select the appropriate option from the drop-down menu and enter the volume/folio number as prompted in the format [volume]/[folio]. Select ‘Search’ to request the result, which will display the Lot on Plan below the search button and return the map on the left-hand side.
Search by Lot on Plan
To locate a property with this search tool you will need to know the lot on plan details including:
- parcel type
- plan number
- lot on plan
Select ‘Search’ to request the result, which will display the Lot on Plan below the search button and return the map on the left-hand side.
Search by Crown Allotment
To locate a property with this search tool you will need to know the crown allotment details including:
- district/town
- allotment type
- allotment number
This search will only return results for current properties still listed with crown allotments. If the property has had the crown allotment details replaced with a lot on plan number, you can request Customer Service to conduct an historical search to find out what the current legal land description is of the property in question.
Search by Locality
Locate your area of interest using locality (suburb if in metropolitan area). As you type, the system will try to match the locality to our address database. As the correct option is presented, click on it to search.
Search by Local Government
Locate your area of interest using the Local Government search. Type in the name of the Local Government by starting with the location name, followed by the prefix. For example, a search for “The City of Swan”, would be typed in as “Swan, City of”.
Search by Townsites
Locate your area of interest using Townsite names. Type in the name of the Townsite e.g. Narrogin and click the Search button.
Search by Districts
Locate your area of interest using the district names. Type in the name of the district e.g. Kent and click the Search button.
Locate by Reserve Number
To locate a property with this search tool you will need to know the Reserve Number (e.g. R12135). If you only have the name of the reserve (e.g. Kings Park), you will need to search using the Points of Interest option. Note that only the number is to be entered e.g. 12135.
Locate by Points of Interest
To locate a property with this search tool you will need to know the name by which the interest is commonly known as (e.g. Manjimup Courthouse). If your search is not an exact match, it will display options for you underneath the search option for you to select.
Search by Coordinates
To locate a property with this search tool you will need to know the coordinates in one of three formats:
- Metres (MGA) coordinates
- Zone - Decimal Degrees
- Latitude
- Longitude - Degree Minutes Seconds
Locate by Land ID Number
To locate a property with this search tool you will need to know the Land ID Number (e.g. 241156). If you do not have this number, you will need to select a different search option.
Locate by Polygon ID Number (PIN)
To locate a property with this search tool you will need to know the Polygon ID Number (PIN) (e.g. 241156). If you do not have this number, you will need to select a different search option.
Locate by State Electorates
To locate a State Electoral District with this search tool you will need to know the electoral district name as approved by the Western Australian Electoral Commission.
Locate by Geodetic Survey Marks
To locate a property with this search option you will need to know the Geodetic Survey mark number. E.g. SSM Bellevue 35B
Click on the Search button ![]() and locate the property or area in question.
and locate the property or area in question.
Then, select the highlighted property on the map. The boundary colour of the property will change colour to indicate which property is selected.
Click on the Available Products button ![]() to see what products are available. This right-handed panel will list all the product names, and their associated cost.
to see what products are available. This right-handed panel will list all the product names, and their associated cost.
There is a link to the product information for each available product, which will open the Landgate website in a new tab to the product page.
If you would like to purchase the product, click on the Add to cart button ![]() to add the product to your shopping cart. This will launch a new tab in your browser to ensure that you can navigate between your shopping cart and Map Viewer Plus so that you can select more products with your original search.
to add the product to your shopping cart. This will launch a new tab in your browser to ensure that you can navigate between your shopping cart and Map Viewer Plus so that you can select more products with your original search.
If you close the shopping cart, but wish to review the cart to proceed to purchase, you can open your cart by clicking on the Shopping Cart button ![]() at the top of the screen. As you add more products, the number next to the cart will increase to indicate how many products you have in the cart ready for payment.
at the top of the screen. As you add more products, the number next to the cart will increase to indicate how many products you have in the cart ready for payment.
Once all your items have been selected and you wish to proceed to the payment screen, select the Shopping Cart button ![]() which will launch the window and prompt you through the transaction process.
which will launch the window and prompt you through the transaction process.
![]()
- Locate the area of interest by using the Search feature.
- Select the Mosaic - select from available aerial imagery, then click Next to define the extent of your required image.
- Confirm image extent, capture date and ground resolution. Click Next to preview your image, select image format, check image output properties (including Datum and Projection), file size and cost. Then Add to cart.
- Review your shopping cart and click Next.
- Enter your details.
- Check and confirm your order.
- Print your receipt.
You may also want to read the Frequently Asked Questions.
1. Locate the area to capture
To start your order, you will need to locate your area of interest using the Locate a Property section. There are multiple ways to search depending on the details about the property location you have on hand.
The addresses or search results found will be listed and the best match will automatically be displayed in the map view window. You can view your selected area of interest as a map, an aerial image, or a combination of both.
Note: If no address or search result is found, a close match to the address or details specified will appear in the list instead. If no result is suitable, you can choose to re-enter your search criteria.
When you are happy with the area of interest, click onto the Buy Aerial Photo button ![]() to start ordering your image.
to start ordering your image.
2. Select the Photo
This step allows you to define the extents of your image and select the aerial imagery you want to view and/or purchase.
1. Select the mosaic you wish to view and/or from which to buy your imagery from.
The most recent image is selected by default. You can choose from older imagery which varies in resolution, by selecting from the mosaics available on the list. If you select a different mosaic the image displayed in the map window will change accordingly.
The aerial mosaics in the list shows those that are relevant for your location. They are listed in order of when the aerial images were captured (with the most recent image appearing at the top of the list). You can click on the mosaic option and hold the mouse over the mosaic name to see the resolution, ground measurement, accuracy statement and capture date.
Once you are happy with your selection, select the Next button. ![]()
2. Select the area you want.
If you want to purchase the aerial imagery displayed in the entire map window, just select the Next button.
Alternatively, you can purchase a section of an aerial image (e.g. cnr Hay St and William St in the 'Perth CBD'), by 'cutting out' the section of the aerial image displayed in the map window. This can be done by using the scissors tool on the toolbar to 'draw' a square/rectangular-shaped box around the desired area of photograph. This box should be visible in the map window and confirms the section being ordered.
Note: if you wish to reset your area of interest, simply redraw your box and the selection will reset.
You can go back to the previous step by selecting the Back button ![]() .
.
When you are happy with your selection, select the Next button.
3. Specify and confirm the imagery
To specify how you wish to have your photography delivered to you, just follow the steps below:
1. Confirm the format of image you require from the selection available in the image format field.
There are four image formats to choose from:
-
- JPEG (or JPG) format (default)
- ECW format
- JPEG2000 (*.jp2) format
- GeoTIFF format
2. The photography displayed on screen, will be based on the default properties of the source image (i.e. the original mosaic that the image was taken from). To change the ground resolution, click the 'view advanced output properties' link to make the appropriate changes.
Important Notes:
Changing the default ground measurement of your aerial imagery will alter the price and quality of your image. To find out more, see Will the size of the photography that I buy affect how it is delivered?
3. Review the cost of your photography. The uncompressed size of your aerial image (in megabytes) will affect the cost. Therefore, if the dimensions of your image change, the size (and consequently the cost) of your image requested will all also change.
Altering the ground measurement/resolution of your image will affect size, quality and cost of the image. Refer to Landgate’s online aerial imagery pricing for more information.
4. Select 'next' to add your aerial imagery product to the shopping cart. You will also be able to review the contents of your entire order.
4. Review Shopping Cart
You can view the contents of your order at any point throughout the ordering process by selecting the shopping cart button ![]() . All products you have selected for purchase are listed, with the delivery type and cost of each product noted alongside each entry. A subtotal of the cost of all products in your order (excluding any delivery charges) is also displayed.
. All products you have selected for purchase are listed, with the delivery type and cost of each product noted alongside each entry. A subtotal of the cost of all products in your order (excluding any delivery charges) is also displayed.
You can remove any unwanted items from your shopping cart by selecting the rubbish bin icon ![]() shown alongside the product you wish to remove. Once this icon is selected, you will be prompted to confirm that you wish to remove the selected item from the trolley before the item is removed completely.
shown alongside the product you wish to remove. Once this icon is selected, you will be prompted to confirm that you wish to remove the selected item from the trolley before the item is removed completely.
From the 'review cart' screen you can choose to either 'continue shopping' or to proceed to the 'your details' screen by selecting the next button.
Note: Regarding delivery of aerial imagery products, delivery is determined by the size of the image. For further details on how this is determined, see Will the size of the photograph that I buy affect how it is delivered?
5. Your details
To process your order, Landgate needs your contact details and your credit card details. We will only contact you if there is an issue with the order.
Be sure to enter the correct email address as this is where we will send the products you have ordered electronically as attachments (or as a download link), as well as your tax invoice. Select 'next' to proceed to the confirm order screen.
Note: If you have a MyLandgate account and this payment method is not visible, see How can I pay online? for further details.
6. Confirm your order
Take some time to check the details of your order. You can change the details by pressing the 'back' button or by clicking on the relevant step in the progress bar along the top of the screen.
The total cost of your order, including any relevant delivery charges, is displayed at this screen. To confirm your order, select the 'submit' button.
Upon placing your order for aerial imagery, you will need to accept the terms and conditions for its use. For more details on this, see Are there any terms and conditions about how I use the photograph I buy?
Note: Once you have submitted your order you cannot request any further changes to your order or your details. Be sure that you have revised your order before submitting.
A processing payment screen will be displayed whilst we are confirming your payment details.
7. Receipt
There is some very important information given to you on the receipt screen:
- The Landgate request number is used to track your order and will assist us in easily identifying your order, if any problems are encountered during the delivery process.
- Your bank receipt number is your record of payment. If there are any problems with your credit card, you will need this number when you speak to your bank.
You may wish to print this page for your records. However, an invoice will be provided with the email delivery of your order. If you have any questions, please contact our Customer Service Team and have your request number on hand, if you have not received your photography product via email within 30 minutes.
1. Select area
To view sales view information, you first need to locate the suburb or street that you are interested in. Use the Locate a Property function to view the map area required.
2. Specify sales search criteria
You can refine the way sales are displayed and reported using several filter options:
- Sales date: you can opt to view sales in the last 6 months, 12 months, 24 months, or 36 months. The system defaults to show all sales. Sales dating back to 1988 will be displayed.
- Sales price: you can opt to view sales within a certain price band, e.g. $250k to $500k. The system defaults to show all sales.
- Sales type: you can view all sales, just registered sales or just pending sales. The default is all sales.
- Strata properties: you can opt to include strata properties, exclude strata properties or only show strata properties. The default is to include strata properties.
3. Specify your map view
Your map will be colour coded either by sale date or sale price as per the legends below:
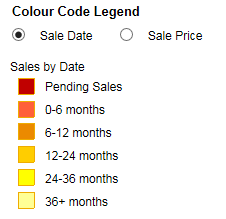
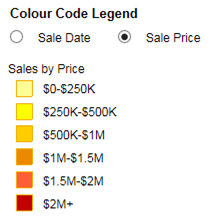
You can choose your preferred colour-coding option by clicking on the relevant radio button with the colour code legend.
If you would like further information pertaining to the sales depicted on the interactive map, a sales report is available to purchase.
To add layers to the map view window you must first zoom to your area of interest. Once you have located your area of interest click on the Layer List button ![]() .
.
This will activate a list of available layers in the right-hand panel of the screen. The layers are grouped under the category headings of:
- Administrative Boundary
- Overview Towns
- Points of Interest
- Bus Stops and Routes
- Roads
- Topography
- Geodetic
- Cadastre
- Survey Index
- Landgate WA Now Mosaic
You can also choose to turn on/off imagery by cycling through the map modes ![]()
![]() base map view
base map view
![]() click on icon again to include aerial imagery view
click on icon again to include aerial imagery view
![]() click on it again for the hybrid view. This will add boundaries, roads, street numbers and Local Government information.
click on it again for the hybrid view. This will add boundaries, roads, street numbers and Local Government information.
To display all the layers within a category, click on the triangle symbol next to the heading. This will expand the list of layers within that heading and allow you to turn on/off the layers you wish to display. Turn the layers on or off by simply clicking in the relevant tick box next to the layer.
![]() Selecting the search function allows a keywork search function
Selecting the search function allows a keywork search function

![]() There is an option at the top of the list where you can click to select these options:
There is an option at the top of the list where you can click to select these options:
- Turn All Layers On
- Turn All Layers Off
- Expand All Layers
- Collapse All Layers
![]() Clicking on this option allows the use of the transparency option on layers
Clicking on this option allows the use of the transparency option on layers
When you have turned layers on, you can use the Legend button ![]() to understand the symbols and colours used on the map.
to understand the symbols and colours used on the map.
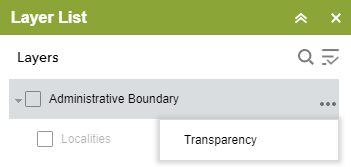

There is a sliding scale of transparency for the operational layers.
![]() When you have turned layers on, you can use the Legend Widget button to understand the symbols and colours used on the map.
When you have turned layers on, you can use the Legend Widget button to understand the symbols and colours used on the map.
There are many layers you can make visible on your map including features such as road names, property boundaries, contour information, schools, points of interest and bus routes.
For a full list of layers and their descriptions please refer to the table below.
|
Operational Layer |
Sub Layer |
Description |
|
Administrative Boundary |
|
Those areas and boundaries defined by government acts, statutes and regulations that are shown for, or relevant to, land development, information and administration purposes of the State Government of Western Australia. |
|
|
Localities |
Locality (Suburbs in metropolitan area) boundaries. |
|
|
Local Government |
Local government (shire) boundaries. |
|
|
Ward boundaries |
Local government ward boundaries. |
|
|
State Electorates |
This layer shows the boundaries of the electorates for the Western Australian Legislative Council (Upper House) and Legislative Assembly (Lower House) |
|
|
Districts |
Legacy boundaries used by the State to assist with land identification for the allocation of crown land. These have reduced relevance in today’s land development process. |
|
|
Town site |
The boundaries of gazetted town sites. |
|
|
Region Scheme – Boundary |
Region Schemes exist for the areas of Perth, Peel and Greater Bunbury. They outline objectives for state and regional development and provide a statutory mechanism to assist strategic planning, coordinate the provision of major infrastructure and set aside areas for regional open space and other community purposes. |
|
|
Region Scheme – Zones & Reserves |
These identify areas where controls on planning exist. |
|
Overview Towns |
|
Towns are identified for reference |
|
Point of interest |
|
A point of interest includes common facilities such as sports clubs, service stations, places of worship, public toilets etc. |
|
|
Health & Education |
Layer illustrates school district boundaries and name and point location of schools. Also shows health care locations e.g. Hospitals. |
|
|
Community |
Layer illustrates community locations such as community and multicultural centres, and police stations. |
|
|
Fire Stations |
Layer illustrates fire station localities. |
|
|
Geographic |
Layer notes all geographic names of features like lakes, beaches, rivers, bays etc. |
|
|
Recreation |
Layer illustrates recreational points on the map such as picnic areas and parks. |
|
|
Transportation |
Layer illustrates locations for transport hubs such as train stations and ferry ports. |
|
|
Commercial & Industry |
Layer illustrates shopping locations and childcare centres. |
|
Bus Stop & Routes |
|
|
|
|
Bus Stops |
Layer illustrates locations where a bus stop has been registered. |
|
|
Bus Routes |
Layer illustrates the roads serviced by bus routes. |
|
Roads |
|
|
|
|
Freeways, Highways & Main Roads (S) |
Major and minor roads, tracks and transport features. |
|
|
Proposed Roads |
Indicates roads that are only at the "proposed" stages of land development (eg: new subdivisions that may not have begun or are at various stages of development) |
|
Topography |
|
Maps the surface features including elevation, water bodies, and other points of interest. |
|
|
Elevation Point |
Also known as a spot height, is a reduced level reading showing height above mean sea level at that position. These are not captured across the full extent of the state. |
|
|
Contour Line |
Is a line drawn on a map that is interpreted from spot heights (elevation point) that indicates height above sea level. They are used to show map readers the general undulations (peaks and troughs) in the terrain. Contour height intervals in the map viewer vary from 5 metres to 20 metres and is dependent upon the area of capture. |
|
Geodetic |
|
Measurements in relation to the size and shape of Earth and the position of points on it in 3-dimensional space |
|
|
Geodetic Survey Marks |
Contains horizontal and vertical coordinates and selected attributes of geodetic survey marks such as Standard Survey Marks (SSM) and Bench Marks (BM). |
|
|
Geodetic Survey Marks Reference Marks |
Buried (usually) permanent marks that protect the position of the visible (usually) geodetic survey marks (SSMs and BMs) |
|
Cadastre |
|
This layer category contains information relating to land parcels. |
|
|
Cadastral Points |
A graphical depiction of parcel boundary points. |
|
|
Cadastral Derivation Points |
A themed view of cadastral point coordinate calculation method providing a visual presentation of likely coordinate accuracy. |
|
|
Cadastral Control Points |
A graphical depiction of cadastral control points. |
|
|
Boundary Lines |
Shows land parcel boundaries for all land parcels in WA. |
|
|
Line Dimensions (in metres) |
Lot boundary dimensions |
|
|
Cadastre Derivation Lines |
A themed view of cadastral line distance derivation method providing a visual presentation of distance accuracy. |
|
|
Lot on Plan – Boundaries |
Line data showing the boundaries of each lot |
|
|
Lot on Plan – Annotation |
Description of the Plan |
|
|
House Numbers |
The street address attribute assigned to each dwelling |
|
|
Lot on Lodged Plan |
Lot that exists on plans that are currently lodged in the Landgate land registry system but not yet dealt on |
|
|
Cadastral Polygons |
A digital representation of land parcels |
|
|
Cadastre Polygons – Annotation |
Description of the land parcels as discrete polygons |
|
|
Land Tenure |
This layer categorizes land parcel type e.g: Freehold subdivision lot, crown subdivision lot/location (Crown Allotment), Reserve, Lease, vacant crown land. Please note: a land parcel shown as Crown Allotment does not necessarily mean it is owned by the state of WA. |
|
|
Easements & Other Interests |
This layer indicates land that is impacted by an easement (does not indicate benefit vs burden) or other interests such as profit apprendre, memorial, carbon covenant etc. |
|
Survey Index |
|
|
|
|
Plan Extent |
The extent of the plan identified |
|
|
Plan Labels |
A digital representation of labels on plans |
|
|
Field Record Labels |
A digital representation of labels associated with field records. Field records are the licensed surveyor’s notes from surveys of land |
|
|
Scanned Survey Index Plans |
The scanned image of legacy Survey Index Plans that are no longer maintained. This is a static dataset |
|
Landgate WA Now Mosaic |
|
Displays aerial imagery over the map |
|
|
WA Now Index |
Notes the date the imagery is taken |
|
|
WA Now Imagery |
Displays the imagery on the map |
Historical imagery is viewed within the Buy Aerial Photo option, ![]() when selecting the different mosaics.
when selecting the different mosaics.
Print Function
![]() The Print Function will allow you to create a PDF Map or PNG32 image from the contents of the screen.
The Print Function will allow you to create a PDF Map or PNG32 image from the contents of the screen.
How to use the Print Function
Step 1 – Locate the property
Locate the property and/or area on the screen that you wish to capture. Turn on any layers that you wish to see on your print. Turn off any layers you wish to hide on your print. Zoom in or out to the desired view. Remember - whatever is on your screen will be loaded into the print templates to the best fit possible.
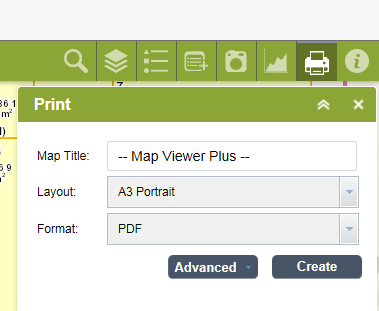
Select the “Print” icon at the top right of the screen. This will display the Print information for you to manipulate the end result.
Step 2 – Change the map features
There are three fields to change the map output – Map Title, Layout, and Format.
Map Title – Type in any map title you’d like for your map. This will appear at the top middle of the map. You can also choose to have no title, just ensure there is no text appearing in this field.
Layout – Map Viewer Plus has standard templates that have been created to lay out the map in five different ways.
- A3 Landscape
- A3 Portrait
- A4 Landscape
- A4 Portrait
- MAP_ONLY - this layout has no border to the map which makes it a good format to create a PNG32 formatted image. By default, the dimensions are 670x500. You can change these dimensions in the Advanced functions.
Format – You can choose between PDF or PNG32. The PDF is the map in a document format. The PNG32 is an image format.
Once you have chosen the Layout and Format for your map, you can select the “Advanced” button to be specific on the output. You can change the preserve from the defaulted Map Scale to Map Extent, as well as the dimensions of a Map Only output.
Map Scale – Selecting Map Scale prints features the same size as seen on the screen.
Map Extent – Selecting Map Extent prints the extent of the map view on the selected page size, Landscape layout is recommended when selecting this option.
Step 3 – Create the map
To create the map, select the “Create” button.
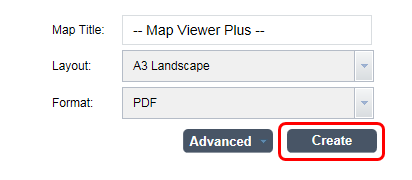
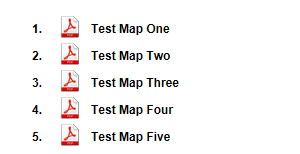
Below these details, you will notice your map begin to create. Your maps will load in chronological order, starting with 1.

Once the map is complete, it will be listed with your map title.

To open your map, click onto the map title. This will open the PDF within your browser, allowing you to use the standard PDF viewer tools to save the map to your computer, or print the map directly to your printer.
As a map is creating, you can move your map to a new location to capture a new area – you don’t have to wait for the map to generate. You can go back to the locate feature of Map Viewer Plus to search and locate a new location or drag the map to the next selection. Your maps will stay in the list until they expire, or you manually clear the prints.
You can create up to 5 maps in Map Viewer Plus through the print function before you need to clear the prints to create more. To clear the prints, select “Clear Prints”. This will delete the maps from the list, allowing you to create and save more. It is important to note that your maps will expire after 30 minutes and be removed from the list, as per the note below your maps.
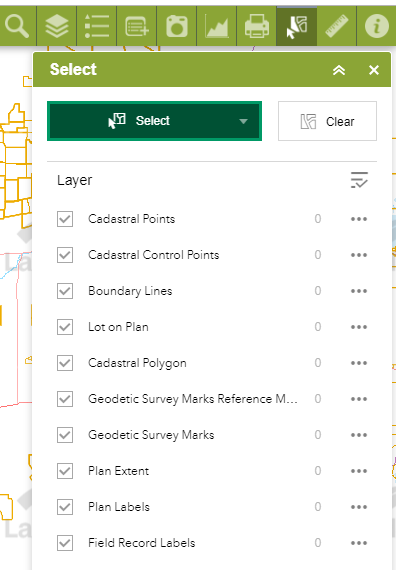
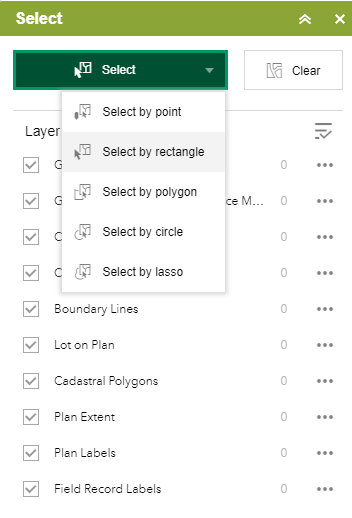
You can select by:
- Point
- Rectangle
- Polygon
- Circle
- Lasso
Step 1. Select the layer/s required using the layer widget
Step 2. Select the area of interest on the map.
Step 3. Select the method of identifying the area of interest i.e. drag a rectangle over area of interest
Step 4. Click on the ![]() to view the selection actions
to view the selection actions
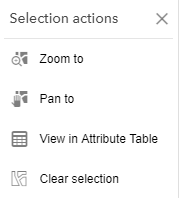
Step 5. Select action
![]() Zoom to will zoom to the selected area
Zoom to will zoom to the selected area
![]() Pan will pan to the selected area
Pan will pan to the selected area
![]() View in Attribute Table option provides a reading pane at the bottom of the pane, each layer has its own tab
View in Attribute Table option provides a reading pane at the bottom of the pane, each layer has its own tab
![]() Clear selection will clear the selected view
Clear selection will clear the selected view
![]() option will provide the view pane below
option will provide the view pane below

The options filter provides these options:

At the bottom of the information pane this displays attribute information when selected
![]()
![]()
At the top of this pane in the middle is the open this pane option.
![]() This information can be filtered by selecting or deselecting the box on the left hand of the attribute table
This information can be filtered by selecting or deselecting the box on the left hand of the attribute table
Attributes will change according to the layer selected
In the bottom right-hand corner is the Overview Map widget. The Overview Map widget displays the current extent of the map within the context of a larger area and updates whenever the map extent changes.
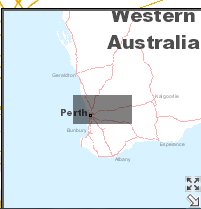
The ![]() option expands this screen
option expands this screen

The Area measurement tool ![]() has these options:
has these options:
- Acres
- Square Miles
- Square Kilometres
- Hectares
- Square Yards
- Square Feet
- Square Feet (US)
- Square Meters
The Distance measuring tool ![]() has these options:
has these options:
- Miles
- Kilometres
- Feet
- Feet (US)
- Meters
- Yards
- Nautical Miles
The Location measurement tool ![]() has these options:
has these options:
- Degrees (decimal)
- Degrees (degrees, minutes, seconds)
- Latitude
- Longitude
- Which is measured at a point that is selected
 via this option
To use these options, click on the option required and click on the area to be measured, move to the next point and click as required, double click to finalise the action. The results will be displayed.
The Information icon
This links to relevant information on the Map Viewer.

Interest Only Plans (IOPs) that have not been dealt on do not appear in the ‘Lot on Lodged Plan’ layer.
To see them, go to the Layer List ![]() and drop down the ‘Survey Index’ layer group.
and drop down the ‘Survey Index’ layer group.
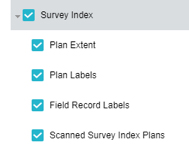
Ensure the ‘Plan Extent’ layer is selected. The spatial extent of lodged IOPs will be displayed along with the spatial extent of all plans.
Frequently asked questions
Aerial imagery is 'photographs' taken from an aircraft at a predetermined altitude and commonly along a predetermined flight grid. All aerial imagery available online is taken vertically, that is, perpendicular to the earth's surface.
Landgate joins hundreds of individual aerial 'photographs' to form one seamless image called a mosaic. It allows you to pan, zoom and select imagery over an area of your choice.
Yes, all our mosaics are digitally corrected to allow for distortions caused by the curvature of the earth’s surface, relief, and any lens aberrations.
Yes, all our imagery is georeferenced. This means our imagery can be related to a ground system of coordinates. However, purchasing imagery in JPEG format will not include this information.
No, the aerial imagery you see online is a mosaic of orthorectified photographic images captured at a point in time. We capture imagery of the Perth metropolitan area in summer and winter every year, regional centres annually, the outer metropolitan area every two years and other areas every five to ten years. Imagery is available from 1948, but the majority of our online archive starts from 1999. We are continually updating our online aerial image library.
Each year, Landgate coordinates the procurement of aerial imagery over Western Australia on behalf of State Government Agencies and Local Government Authorities (LGAs). This imagery is obtained in support of specific State and Local Government initiatives and managed within a discrete annual budget.
For that reason, the annual capture program will only acquire aerial imagery in direct support of a State initiative or LGA project. This may typically occur over; significant infrastructure projects, populated areas, Aboriginal Communities, forests and erosion and rehabilitation zones.
Consequently, the currency of a mosaic over an area will be a function of the government demand for imagery in that region. Because aerial imagery will not be flown without a reason, there will be significant parts of the State that do not benefit from periodical updates. In fact, there are areas within the East Arid that have never been captured.
Yes, our aerial imagery dates from 1948 onwards.
You will receive:
- Aerial imagery for the area you have selected.
- A licence which advises you on the permitted usage of the imagery after purchase.
- Supporting information (metadata). For example, the date of capture and ground resolution.
- For ECW, JPEG 2000 & GeoTIFF only, georeferencing (coordinate and zone) information to advise of the image's spatial position.
You can pay for your imagery online in two ways:
- Credit card (MasterCard and Visa are accepted)
- Landgate Customer Account. To enable payment via your Landgate Customer Account you must access the services via To do this, log in to MyLandgate and select aerial photography under Online Shop from your MyLandgate channel homepage. This will take you to the aerial imagery service and will pre-populate your account details within the shopping cart.
For further details about opening a Landgate Customer Account please call + 61 (0)8 9273 7373 or email customerservice@landgate.wa.gov.au
No, your imagery will not show the property boundary lines that you can see on the Map Viewer Plus.
Yes, it will. If the file size is less than 10MB, it will be emailed directly. Above 10MB, you will be emailed a secure link to download the imagery. This link will remain live for 10 days.
As a general rule if you are buying small images for general purpose use it is best to select a JPEG format. Images in this format can be used within standard graphical/desktop publishing and word processing software, and for that reason, they are not georeferenced.
If you are buying larger images for professional use, it is best to select ECW or JPEG2000 format. Please refer to the detailed information below on the various formats we offer.
JPEG (or JPG) is the best format for general use of smaller sized aerial images, but contains no spatial attribution or location information. Note: Please be aware that large-size JPEG images (e.g. over 100MB) may be difficult to load into your software package. If you require a large size image, it is suggested that you consider ordering an ECW or JPEG2000 format image.
ECW format is best for imagery of particularly large areas. ECWs are georeferenced and maintain the quality of an image as you zoom in. It does this by automatically reconstructing the image as you zoom in, maintaining the best possible resolution for that scale.
JPEG2000 is a similar format to ECW, and suited for imagery over particularly large areas. JPEG2000 (or *.JP2) will provide much better image quality at smaller file sizes than the standard JPEG format. This format is also georeferenced and best to use when high visual quality at a reduced file size is required.
GeoTIFF (as the name suggests) has georeferencing information embedded with a TIFF file. It is an uncompressed format and is best for general use of smaller sized aerial images. Note: Please be aware that large size GeoTIFF images (e.g. over 500MB) may be difficult to load into your software package. If you require a large size image, it is suggested that you consider ordering an ECW or JPEG2000 format image.
Image resolution is linked to ‘ground measurement‘. For optimum quality, Landgate recommends that images are ordered at their default ground measurement (resolution) where possible.
If you wish to change the resolution of an image you will need to alter the ground measurement (in pixels) of the image. You can do this by going to the 'Image Output Properties'. Then select the appropriate 'Ground Measurement' value. Please refer to samples of imagery to view various resolutions to determine which is best for your purpose.
Note: The ground measurement shown on the screen (defaulted) will be as it was when the imagery was initially captured. Changing the ground measurement value of an image will affect the price and quality of your aerial imagery product.
If you require your image to be changed to another ground measurement that is different to that made available online, please call +61 (0)8 9273 7373 or email geodata@landgate.wa.gov.au for further details. Please note that charges will apply.
Yes. To do this, go to the "Image Output Properties" screen and then select "Advanced Output Properties". Then continue by choosing the appropriate "Projection" and "Datum" for your image.
Note: The projection/datum shown (default) will be that of the aerial image at the time of capture. Changing the projection of your image will not affect the price of your aerial imagery order.
A ‘black space’ on a portion of the imagery is an area that was historically restricted for public viewing for security reasons, e.g. Prisons and Australian Defence Force installations. They cannot be removed. Recent imagery is no longer affected by ‘black space’.
A ‘white/black space‘ that exists on the edge of an aerial image displays the boundary of the mosaic. To view imagery outside of these boundary lines, you need to refer to the adjacent mosaic.
The online shop will deliver your imagery (by email or download link) within approximately 30 minutes.
This service has been developed to work with the major internet browsers with the exception of Internet Explorer.
Yes, the aerial imagery you purchase must be used in a manner specified by a Landgate licence which you will be asked to accept at the time of purchase.
ESRI is an American product and as a result we are limited to American spelling.
A video is available - please refer to the ‘Selecting multiple polygons’ video for instructions.
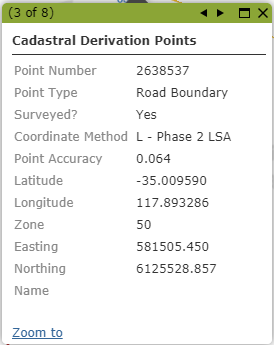
The Name attribute is blank when there is no name data available.

Label conflict should not occur within the same operational layer. If you have multiple Operational layers on, then label clash may occur. Try to pan which should move the labels from conflicting. Alternatively, you can turn off the operational layer/sub layer that is blocking the label.
Check to see if you have Land Tenure sub layer turned on. Land Tenure has a ‘fill symbology’ which covers the Sales Layer. Turn off Land Tenure you should then be able to see Property Sales View.
Excel is formatting the number automatically. If you click on the column itself you will see the raw value. If you change the column to a number with eight decimal points you will see the whole value.
iPads/iPhones are unable to download CSV and all mobile devices are unable to highlight multiple lots without a physical keyboard attached.
Each time you switch between the different views (Map, Aerial and Hybrid), click on Buy Aerial Photo (historical imagery) and Property Sales View widgets, the layer list selection will change to their default selections.
Yes, simply click on the App state which is displayed in the bottom right-hand corner.
After selecting the features using the Select Widget, you can view the selected features in the Attribute Table by clicking on the layers Selection actions and selecting View in Attribute Table in the Select Widget.

Go to the select widget and clear your selection.
If you have recently cleared your cache then the history App state is unable to restore the map extent and layers.